For letter ‘F’ in our A to Z of effective presentations, we’ve gone practical, sharing formatting tips on how to use simple, but effective PowerPoint tools that help you upgrade your slides. Usually when we present them in our storytelling training workshops, we’re met with lots of “oohs” and “ahhs” as people realise just how much PowerPoint has to offer. We hope our explanations of these brilliant basics will help you get one step closer to more engaging presentations.
Guides
Many of the templates you use, either PowerPoint default or your company brand, will contain ‘Guides’ that help create the various layouts. They are small, dotted lines that you can add to all your slides, to help you align elements in specific places, or make sure the title, logo or footers are consistently positioned throughout the presentation. A couple of important things guides are used for:
Margins
Set clear space around the edge of your slide as the ‘no-go’ zone for your content. Keeping everything within these margins creates a natural frame for it, and if used consistently across your presentation, will improve the visual appeal. If you are finding it hard to keep within your set margins, think about the content you are presenting. Have you got too much? Can you spread across different slides?
Snap guides
Whatever guide you set, you can snap to it. This means that you do not have to spend time nudging elements. Instead, simply drag the corners or edges of your shape towards the guide, and as they meet, the shape should ‘ping’ in place. This is great if you want to quickly and easily position a text box or a shape the same across all slides and will provide your audience with a more seamless viewing experience. As a minimum, you should ensure all your titles are in the same place for a consistent anchor point.
How to use your guides
Where are my guides?
Often, the presentation you are working on will have guides already set up. If you cannot see them on the slide, you can turn them on by right clicking an empty part of the slide and selecting the arrow next to “Grids and Guidelines”. Then, make sure the “Guides” box is ticked.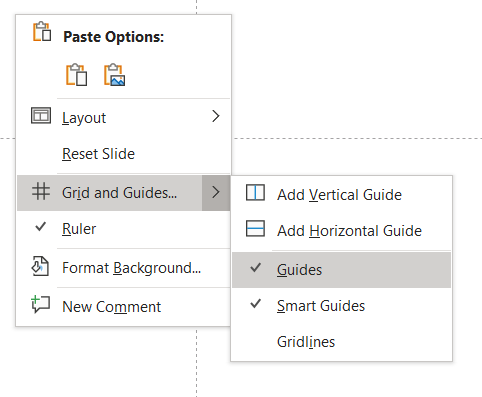
How do I create new guides?
Right click on any slide and select the arrow next to “Grids and Guidelines”. Then, choose to Add a Vertical or Horizontal Guide. You can add as many as you like, and they will not show up on the slide when you are presenting.
How do I delete guides?
If you want to a delete a guide, right click it, and choose to delete.
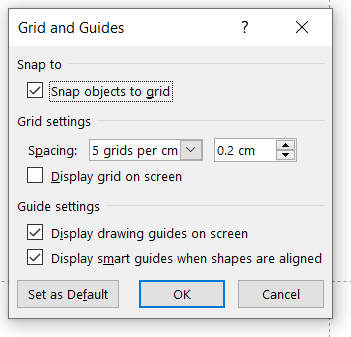
How can I snap to grid?
Right click on an empty part of the slide, then click “Grids and Guidelines” (not the arrow next to it). This will launch a separate window where you can tick “Snap objects to grid”.
Shapes
Next up is shapes. Most people know how to add a shape to a slide (INSERT – SHAPES) and change its colour and size, but few know about the magic of the ‘orange circles’. For example, let’s take a rectangle with rounded corners. The default shape looks like this, which you can make bigger or smaller by dragging the white circles on every corner:
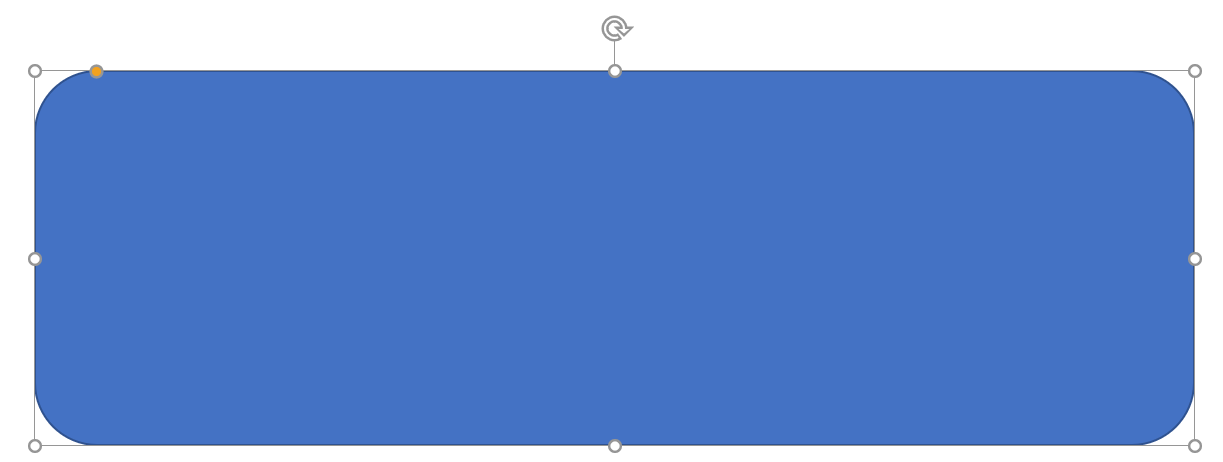
However, did you know that by moving the orange circle in the top left, you can change the curvature of the shape? By dragging it out, it makes this:

Or by dragging it inwards, you can make it look like this:

The technique can be used with most shapes and offers lots of opportunities for customisation. By moving away from PowerPoint’s default, and sometimes elementary, shapes you can create something that looks and feels more polished and professional.
Text
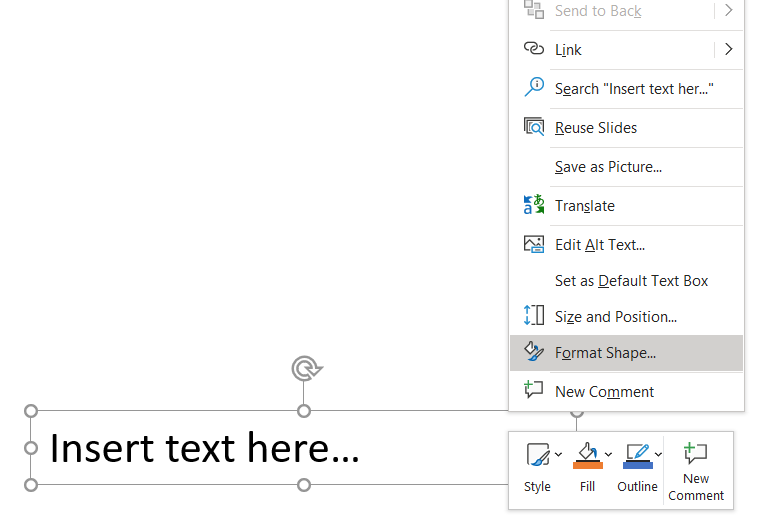
Next up is the text box. Again, you may know how to change the font or text size, but did you know you can also edit the text margins, direction of text and transparency? Once you have added in a textbox, right click, and select “Format Shape…”
This will launch a new panel that will appear on the right. Underneath “Format Shape”, there are two sub menus: “Shape Options” and “Text Options”. Click through these and explore what you can do to your text and the box it is in.
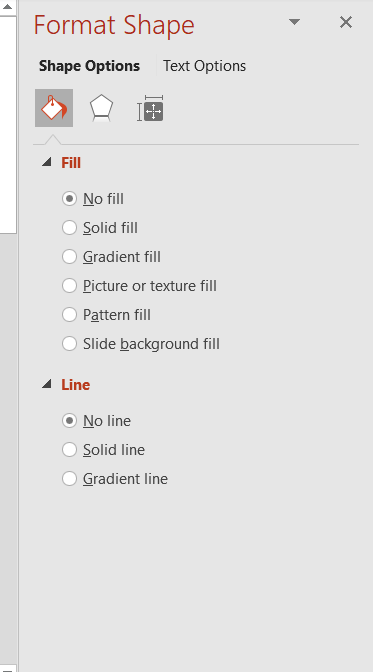
One of the most used (and useful) menus at Maxwell Rogers is “Text box” under “Text Options”:
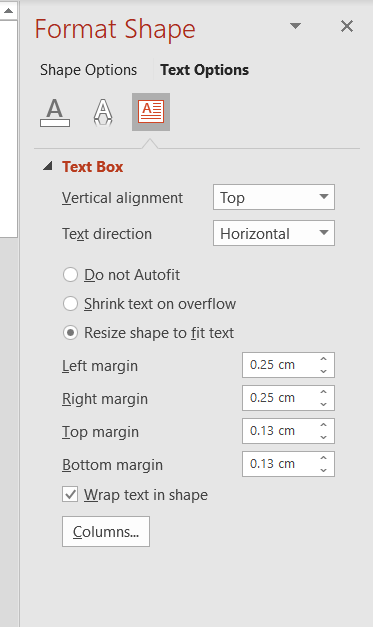
Here you can adjust your margins, ensure your text wraps to your shape, and most importantly – “do not autofit” to keep you in complete control of your slide design.
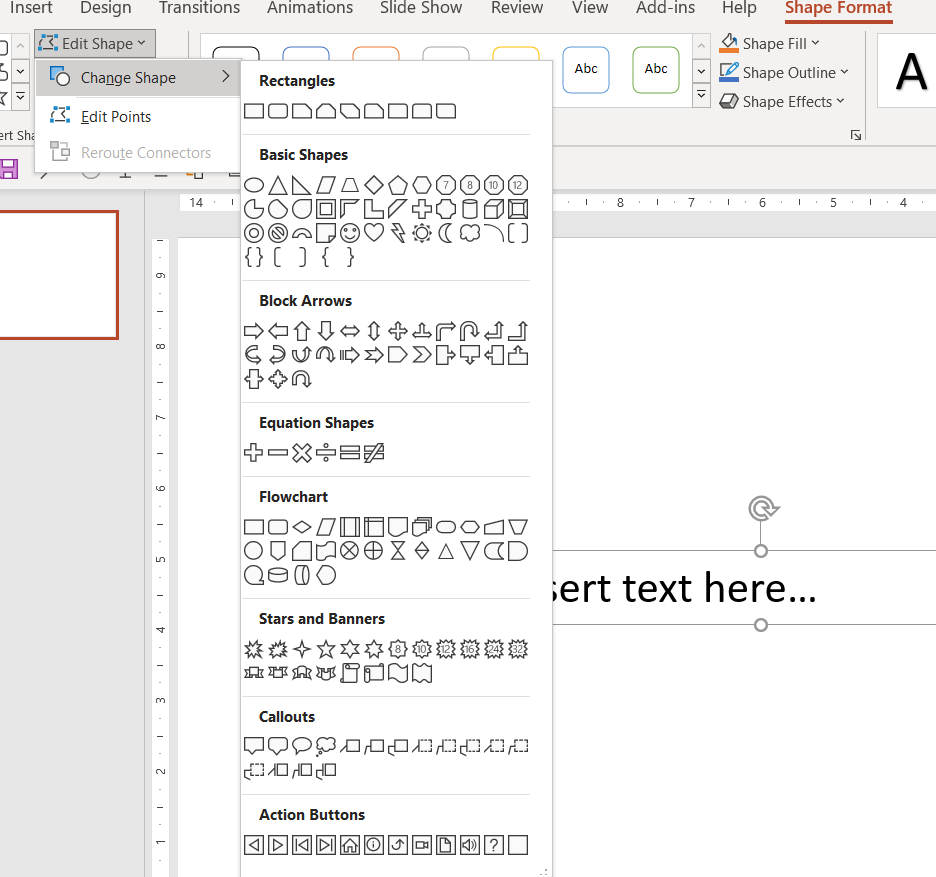
Text in shapes
When working on our clients’ presentations, we often find shapes which have separate text boxes sitting on top. This adds complexity to the slide and requires expert skills to get both elements aligned, working together, and looking good. It is also unnecessary as PowerPoint gives you the option to change the shape and colour of the textbox itself. Just click on it to bring up the “Shape format” tab at the top of your screen. Click on this tab, and on the left-hand- side, in the “Insert Shape” section, you will find a small button titled “Edit shape”. Here, you can change it to any of the available options, then just adjust the colour like you would with any other shape. By doing this, it is much easier to move the text and shape around together, manipulate and edit it.
So, there you have a few examples of what PowerPoint can do, and how some of the basic tools can significantly upgrade the look of your slides. Let us know if you have any questions or would like us to write more practical articles like this. Alternatively, if you need a professionally designed presentation that is sure to impress, send us an email at studio@maxwellrogers.co.uk.